Ahoy!
Lets deal with those horrible lightmappings.
I have this Spirit palmtree, with this Uv Set:
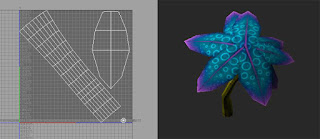
Looks nice. The leaves have their UVs overlapping.
So lets go to Unity to do a test. Just put a few on the scene, a plane (checked them as Static) and a direct light. I used the default parameters with the Directional Lightmap but changing the resolution to 12 in order to speed up the process a bit.
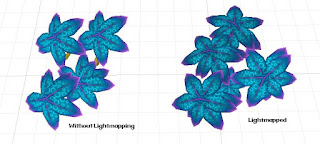
I´m having always bad results when I do the lightmap. The projected shadow on the texture is incorrect. I saw this on forums as"Bleeding Shadows".
We can fix this easy. Lets go to Maya (or whatever soft, it will work too).
Problem is, Unity needs another set of Uvs per Static mesh in order to calculate the Lightmapping. This Uv set (the lightmapping one), needs to have non-overlapping faces, and a bit of spacing between them so the shadows doesnt project on to each other)
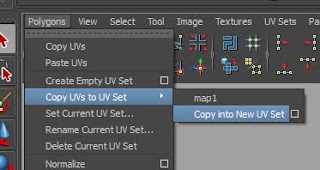
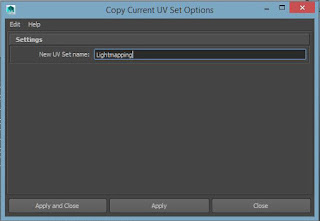
Now we should have two identical Uv Sets:
Select your mesh and go to Polygons, Layout Uvs Options (while you have selected the desired Uv Set). This are my settings:
As a result I got this:
We still use the first Uv Set for the Texture, and the second Uv Set for the Lightmapping.
Now our mesh is ready to be Lightmapped ;)
Have fun!
Maya vs Me
Common Maya Issues
Monday, March 7, 2016
Wednesday, September 9, 2015
Animation Reference into Maya
Ahoy!
Lets import some video reference to our Maya scene. Open any video editing software you use and separate the video to single frames. I used Photoshop to do it (yeah I know...). So, open the video.
Now select Export, Render Video.
Change settings to Photoshop Image Secuence. Adjust Document size and Frame Rate to your project.
You will get an Image Secuence to the desired folder ready to use on Maya.
Open Maya and your scene with the Character. Create a plane behind your Character.
Now select Export, Render Video.
Change settings to Photoshop Image Secuence. Adjust Document size and Frame Rate to your project.
Now go to Hypershade and create a New Material (Lambert will do the trick). Click the checker next to the color tab to add a file to the material Color Output.
Then click on the folder icon and select the first frame of your Image Secuence. Click the checkbox Use Image Secuence.
And there it is, you have a Reference for animation on the perspective view.
Just need to move the time slider and start posing your character.
Have fun!
Wednesday, June 24, 2015
Driven Keys not working
Ahoy!
So here was one of my issues while I was rigging a wing while following a Digital Tutors course. The wing was separated in three main parts to control the fold of the wing and about 5 to 6 parts on each one to control the feathers.
I´ve created a Control (the 3 big cubes) for each main wing part, and a Locator as a child to control the fold. I´ve added an Attribute on the cube control (Wing Fold).
I also connected that Attribute to the rotation of the Locators.
I used a SetDriven key between the cube and the locator with the start and end position of the wing fold.
But when I was testing it, the wing only showed those positions, the ones I have added. After a lot of research, rebuilding the rig, finally found the solution. It was pretty simple, just head to the graph editor and check the tangents on those locators (the driven ones). They were set to stepped, that's why Maya didn´t interpolate the values on the Attribute Wing Fold. Just change them to linear.
Now it works fine.
I´ve seen this issue on other rig sets:
- Hand rigs, were the fingers wont interpolate while opening or closing them
- Eyes rigs, when eyelids only shows the start and end position of the blink.
Just remember to check the tangents on your Custom attributes and on everything you connect them to.
Have fun!
So here was one of my issues while I was rigging a wing while following a Digital Tutors course. The wing was separated in three main parts to control the fold of the wing and about 5 to 6 parts on each one to control the feathers.
I´ve created a Control (the 3 big cubes) for each main wing part, and a Locator as a child to control the fold. I´ve added an Attribute on the cube control (Wing Fold).
I also connected that Attribute to the rotation of the Locators.
I used a SetDriven key between the cube and the locator with the start and end position of the wing fold.
Now it works fine.
I´ve seen this issue on other rig sets:
- Hand rigs, were the fingers wont interpolate while opening or closing them
- Eyes rigs, when eyelids only shows the start and end position of the blink.
Just remember to check the tangents on your Custom attributes and on everything you connect them to.
Have fun!
Ahoy!
Hi there, Internet and Maya users,
I´m Jose Manuel, a 3d artist working at Risin Goat. Last two years I´ve been modeling, rigging and animating the characters and environments of our first project A Rite from the Stars.
We are developing with Autodesk Maya and Unity. We were a noob team developing Videogames and faced the consecuences :)
So I decided to create this blog in order to help Maya users (sometimes Unity) with those daily issues, the one´s I had to deal with.
Hope this is helpful to you.
Live long and prosper, Jose.
Subscribe to:
Posts (Atom)